
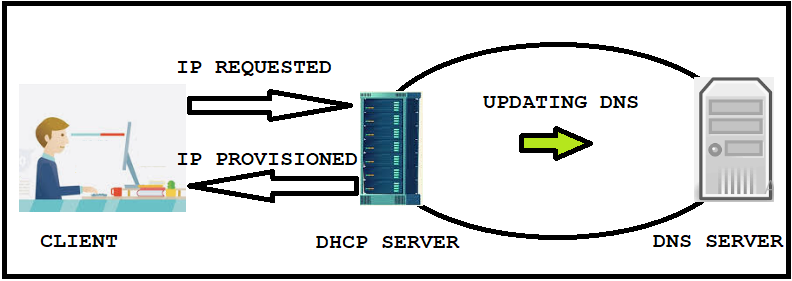
What is Dynamic DNS (DDNS)?
DNS stands for either Domain Name System or Domain Name Server. DNS used for name resolution between server hostname and IP Address. Many times there will be a change in system hostname or IP for some reason. During this time all DNS zone entries must be updated manually. Also accuracy of changes implemented to be considered. Think what happens if you have 500+ machines. Keeping them up-to-date by tracking manually is hectic.
What is Dynamic DNS?
In short name DDNS. DDNS nothing but making our DNS server to identify the changes in client hostname and IP address then update zone file accordingly. This is automated process, no manual intervention required. It completely reduces the overhead of system admin. Chance of server corruption will be very less because less manual intervention.
with help of DHCP server we update DNS forward and reverse lookup zones automatically without manual intervention. That makes our DNS (Domain Name System) to work as Dynamic DNS server.
Access NATed VM from HOST Machine:-
VIrtual Box--> VM1 Setting --> Network --> NAT Adapter --> Advanced --> PortForwarding -->
NAME – Protocol – Host IP- Host Port – Guest IP – Guest Port
SSH TCP 2222 22
Now from host Machine: putty client
Host Name: localhost:2222
you can access the forwarded port like a local port:
ssh root@localhost
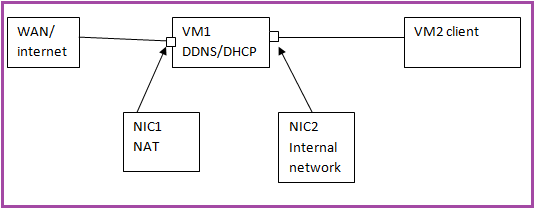
LAB Scenario
Virtual Box
- VM1: DNS/DHCP Server – dns-dhcp.example.com
- OS: RHEL 7 x86_64
- Network:
- NIC1-NAT — WAN port – DHCP
- NIC2- Internal Network — LAN port (DMZ Network) – Manual IP- 192.168.56.101/24
- selinux- disabled
- firewall- disabled
- NetworkManager – disable
- do not change /etc/hosts
- DHCP IP range: 192.168.56.21 – 192.168.56.40
VM2: Client – client1.example.com
- OS: RHEL 7 x86_64
- Network: NIC1- Internal Network — LAN port – IP : Automatically assigned by DHCP (You can test from any number of windows and Linux clients)
- selinux- disabled
- firewall- disabled
- NetworkManager – disable
- do not change /etc/hosts
/etc/resolve.conf
nameserver 192.168.56.101
STEPS OF ACTIONS
PKG installation
Install all bind and dhcp packages
# yum install bind bind-chroot dhcpd net-toools bind-utils -y
Enable both the service in required run levels
#chkconfig named on
#chkconfig dhcpd on
Configure DNS server:
Copy the sample bind configuration file under chroot environment. It will reflected automatically under /etc.
# cp /usr/share/doc/bind-9.11.4/sample/etc/named.conf /var/named/chroot/etc/
#vi /etc/named.conf
options {
        listen-on port 53 { 192.168.56.101; };
        listen-on-v6 port 53 { ::1; };
        directory       "/var/named";
        dump-file       "/var/named/data/cache_dump.db";
        statistics-file "/var/named/data/named_stats.txt";
        memstatistics-file "/var/named/data/named_mem_stats.txt";
        recursing-file  "/var/named/data/named.recursing";
        secroots-file   "/var/named/data/named.secroots";
        allow-query     { localhost; 192.168.56.0/24; };
        allow-query-cache { localhost; 192.168.56.0/24; };

        /*
         - If you are building an AUTHORITATIVE DNS server, do NOT enable recursion.
         - If you are building a RECURSIVE (caching) DNS server, you need to enable
           recursion.
         - If your recursive DNS server has a public IP address, you MUST enable access
           control to limit queries to your legitimate users. Failing to do so will
           cause your server to become part of large scale DNS amplification
           attacks. Implementing BCP38 within your network would greatly
           reduce such attack surface
        */

        recursion yes;

#       dnssec-enable yes;
#       dnssec-validation yes;

        /* Path to ISC DLV key */
#       bindkeys-file "/etc/named.root.key";
#       managed-keys-directory "/var/named/dynamic";
#       pid-file "/run/named/named.pid";
#       session-keyfile "/run/named/session.key";
};

/* Forward Lookup Zone */
zone "example.com" {
type master;
file "example.com.zone";
notify no;
allow-query { any; };
allow-update { 192.168.56.101; }; /* this should be dhcp server address*/
};

/* Reverse Lookup Zone */
zone "56.168.192.in-addr.arpa" {
type master;
file "56.168.192.in-addr.arpa.zone";
notify no;
allow-query { any; };
allow-update { 192.168.56.101; };
};
Configuring rndc
“rndc” is a command line tool. It allow us to manage named service from both local and remote.
#rndc-confgen
From the above command output, copy the key and control section to /etc/named.conf file. It looks like below.
key "rndc-key" {
      algorithm hmac-md5;
      secret "cbs4+m1P9IGhlNnk9O4bAg==";
};

controls {
      inet 127.0.0.1 port 953
              allow { 127.0.0.1; } keys { "rndc-key"; };
};

controls {
      inet 192.168.56.101 port 953
              allow { 192.168.56.101; } keys { "rndc-key"; };
};
Again copy the rndc configuration and key section to the /etc/rndc.conf
[root@dns-dhcp ~]# cat /etc/rndc.conf
key "rndc-key" {
        algorithm hmac-md5;
        secret "cbs4+m1P9IGhlNnk9O4bAg==";
};

options {
        default-key "rndc-key";
        default-server 192.168.56.101;
       default-port 953;
};
Creating Zone Files
Zone file are the one holds mapping between IP address and System names. The named daemon refers these two files for any query.
- Forward lookup zone
[root@dns-dhcp ~]# cat /var/named/example.com.zone
$TTL 86400      ; 1 day

@             IN SOA  dns-dhcp.example.com. root.example.com. (
                                123        ; serial
                                10800      ; refresh (3 hours)
                                900        ; retry (15 minutes)
                                604800     ; expire (1 week)
                               86400      ; minimum (1 day)
                                )

                        NS      dns-dhcp.example.com.
                        A       192.168.56.101
client1                 A       192.168.56.102
dns-dhcp                A       192.168.56.101
- Reverse lookup zone
[root@dns-dhcp ~]# cat /var/named/56.168.192.in-addr.arpa.zone
$TTL 86400      ; 1 day
@                            IN SOA  56.168.192.in-addr.arpa. root.example.com. (
                                77         ; serial
                                86400      ; refresh (1 day)
                                3600       ; retry (1 hour)
                                604800     ; expire (1 week)
                               10800      ; minimum (3 hours)
                                )

                        NS      dns-dhcp.example.com.
                        A       192.168.56.101
101                     PTR     dns-dhcp.example.com.
102                     PTR     client1.example.com.
Verify configured files
#named-checkconf /etc/named.conf
#named-checkzone example.com /var/named/example.com.zone
# named-checkzone 56.168.192.in-addr.arpa /var/named/56.168.192.in-addr.arpa.zone
#service named restart
Check named server status
#rndc status
Configure DHCP server
copy sample dhcp configuration file and do below changes.
#cp /usr/share/doc/dhcp*/dhcpd.conf.sample /etc/dhcp/dhcpd.conf
[root@dns-dhcp ~]# cat /etc/dhcp/dhcpd.conf
option domain-name "example.com";
option domain-name-servers dns-dhcp.example.com;
default-lease-time 600;
max-lease-time 7200;

# Use this to enble / disable dynamic dns updates globally.
ddns-update-style interim;
ddns-updates on;
ignore client-updates;
update-static-leases on;
ddns-domainname "example.com";
server-identifier dns-dhcp.example.com;

# If this DHCP server is the official DHCP server for the local
# network, the authoritative directive should be uncommented.

authoritative;

# Use this to send dhcp log messages to a different log file (you also
# have to hack syslog.conf to complete the redirection).
#log-facility local7;

/* Zone Declaration for Dynamic Update */
zone example.com. {
primary 192.168.56.101;
}

zone 56.168.192.in-addr.arpa. {
primary 192.168.56.101;
}

subnet 192.168.56.0 netmask 255.255.255.0 {
                                                range 192.168.56.21 192.168.56.40;
                                                option domain-name-servers 192.168.56.101;
                                                option domain-name "example.com";
                                                option routers 192.168.56.101;
                                                option broadcast-address 192.168.56.255;
                                                default-lease-time 600;
                                               max-lease-time 7200;
                                        }
#service dhcpd restart
/*route internal packet to external network */
at first enable ip forwarding
# echo 1 > /proc/sys/net/ipv4/ip_forward
reset iptables rules
# iptables -F
# iptables -t nat -F
allow forwarding from the local network
iptables -A FORWARD -i eth0 -o wth0 -j ACCEPT
allow responses back in
iptables -A FORWARD -i wth0 -o eth0 -m state --state RELATED,ESTABLISHED -j ACCEPT
masquerade the ip address
iptables -t nat -A POSTROUTING -o wth0 -j MASQUERADE
make routing changes persistent
/etc/sysctl.conf and uncommenting the net.ipv4.ip_forward = 1
should install iptables-services package.
Then service iptables save will work. Also these commands will work too:
 # iptables-save > /etc/sysconfig/iptables
# ip6tables-save > /etc/sysconfig/ip6tables
Client Configuration
Update resolver details
#vi /etc/resolv.conf
nameserver 192.168.56.101
DOMAIN=example.com
#vi /etc/hosts
/* make sure proper host entry entered*/
On all other client machines (rhel2.example.com) remove static IP if there is any, configure boot protocol as DHCP and restart network service.
#vi /etc/sysconfig/network-scripts/ifcfg-etho
BOOTPROTO=dhcp
Testing at client
#nslookup rhel2.example.com
#nslookup 192.168.1.22
Hope you like the blog, do practice and let us know with your suggestions.
- Author (Abhishek Dwivedi)

What horrors we faced in Boras 🙂
LikeLike
Ha ha ha …. 😉
LikeLike
A big thank you for your blog.Really looking forward to read more. Fantastic.
LikeLike